Long gone are the times when you could use only regular relational database such as MSSQL or Oracle. Today, there is a plethora of databases to choose from. NoSQL databases (as MongoDB) are gaining a lot of traction these days. There are also new breeds of columnar databases (Redshift, Endeca), distributed databases (Cassandra or Couchbase), in-memory databases (SAP HANA) ... as well as many, many more.
What is MemSQL?
And then there is MemSQL, which is a distributed, in-memory, relational database that supports columnar storage. The first publicly available version was introduced in 2013, and since then, many customers have started using it (including Zynga and Pinterest). MemSQL features ANSI SQL support and is known for exceptional speed in both query processing and data ingest.
MemSQL is wire-compatible with MySQL, so moving from regular relation databases shouldn't be too difficult for beginners.
In this blog, I’m going to show you how to connect to MemSQL from CloverDX and suggest a few tricks on how to optimize your connection. In my example, I’ll be using a MemSQL instance running on AWS. To learn more about installing MemSQL, I recommend reading this article. It helped me a lot when I set it up for myself.
MemSQL Meets CloverDX
Let's take a look what functionality we can use in CloverDX for MemSQL.
In this post, I’m going to cover JDBC-based connection to MemSQL. Although you can use database-specific command line utilities to load/unload data, using the JDBC-compatible drivers and CloverDX components will make your life so much easier.
What is JDBC?
JDBC is the interface for Java programmers to be able to communicate with various databases, allowing them to reuse pre-existing drivers to communicate with any DB that implements JDBC API without writing boilerplate code from scratch. For more information, check out this explanation on Java Database Connectivity.
Tip: For connecting with any JDBC client (you could use MySQL Workbench), even for CloverDX, you should open the 3306 (by default) port. Note that in AWS you can modify the Security Group after you spin up an instance should you need to change it later.
Creating a DB Connection in CloverDX Designer
Navigate to Outline, right-click Connections and choose Create DB Connection.
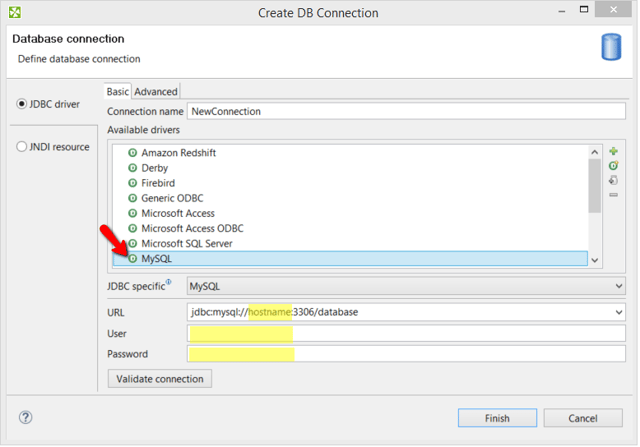
Since MemSQL is compatible with MySQL, simply pick the MySQL driver in 'Create DB connection' dialog and replace 'hostname' in the 'URL' field with your 'Public DNS' value. In the same field, replace 'database' string with the real name of the DB. (There is by default always 'memsql' DB on your MemSQL cluster, but you can create your own.)
Your URL should look like this:
jdbc:mysql://<your-public-dns>:3306/memsql
The 'User' value is 'root' and the 'Password' is 'Instance ID' (this was the default for me when I used the MemSQL AMI from Amazon’s Marketplace).
To make sure things work properly, click the 'Validate connection' button, and if everything is OK, you should get a 'Valid connection' message in the header portion of this wizard.
Tip 1: If you’re running MemSQL on Amazon, double check that your Security group of MemSQL EC2 instance has an appropriate rule for Inbound port 3306. That is the port you’re connecting from outside to MemSQL. You can open it to whole world, but I would recommend opening it only to your IP or subnet of IPs.

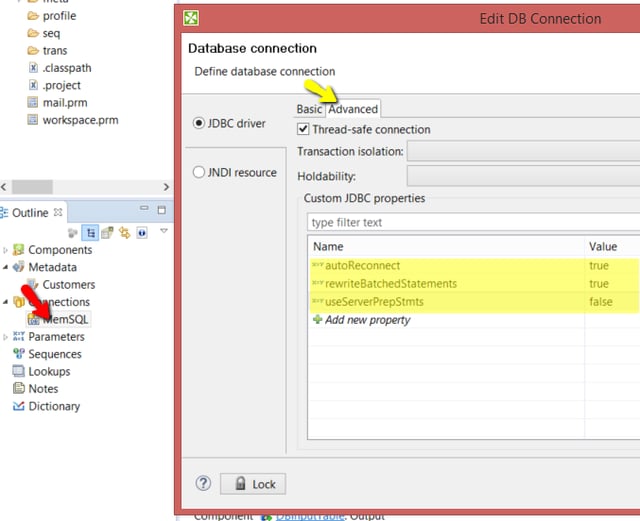
Tip 2: I noticed that some installations of MySQL need additional properties in JDBC connection string for better performance. For MemSQL, it’s the same.
I would highly recommend these settings:
- autoReconnect=true
- rewriteBatchedStatements=true
- useServerPrepStmts=false
Check Advanced tab in 'Edit DB Connection' dialog.
After you’ve created a working DB connection, you can use generic components to communicate with MemSQL.
Create Tables
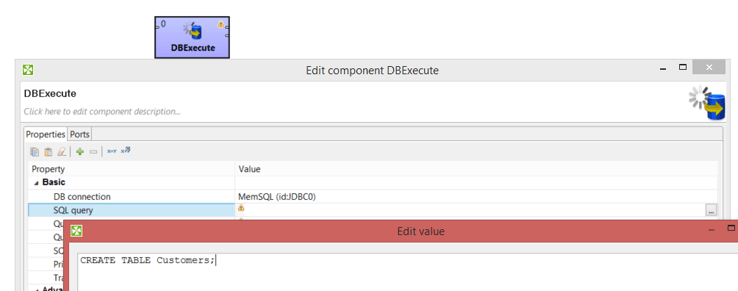
In CloverDX, you use the DBExecute component to create tables, alter tables, and add indexes.
Write to Tables
Use the DBOutputTable component to Insert, Update, and Delete records in MemSQL.
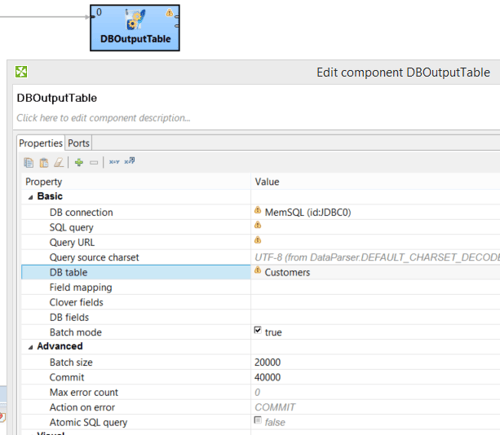
Tip 1: Check the documentation for different approaches on how to map input data to the DB table. In my example, I’m using to my advantage the fact that the input metadata have the same structure as 'Customers' table, which allows me to pick only one value in the 'DB Table' field. This is very neat, and very fast.
Tip 2: Play with the Batch size and Commit size values. With MemSQL you can go high (but I wouldn't try values higher than 100,000. In my experiment, MemSQL couldn't handle it). And don't forget to set 'Batch mode' to true!
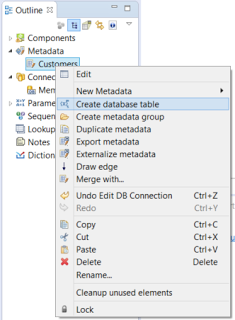
Did you know? You can create a database table directly from metadata (definition of records you are processing in a CloverDX transformation) when you have a working DB connection. Right click on metadata in the Outline, select 'Create database table' and modify pre-selected DDL based on your requirements.
Read Data
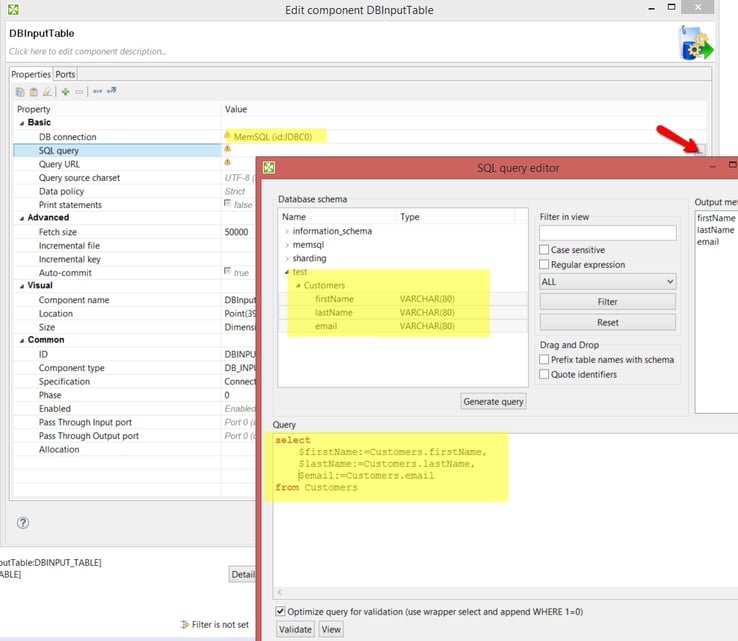
Use DBInputTable to read data from MemSQL tables.
Advanced Functionality in CloverDX
This blog serves as a quick crash course on MemSQL and CloverDX. I hope it enables you to embark on your own investigation of the possibilities of MemSQL with the help of CloverDX Designer.
In future blogs, I want to show you the advanced functionality of CloverDX. (MemSQL is a massive parallel system, so it should be good with loading data in parallel. And CloverDX has a neat data partitioning function, which should give you a nice performance boost). I also want to cover some different configurations and performance testing.
If you have any questions, please feel free to share them in the comments or contact us.
Case study: 'Automated data cleansing platform replaces manual processes'