Love it or hate it, you can’t deny Microsoft Excel’s track record. Nearly 900,000 companies in the United States use Excel for their data entry needs, with millions more using it worldwide. But, while Excel might be your tried and trusted tool, you could still end up with errors if you don’t conduct thorough data validation. And that could lead to poor decision-making.
So, how can you validate your Excel data? Let’s look at some basic and advanced techniques.
How to validate your data in Excel
Excel has a data validation function. It works by restricting the type of data or the values that users can enter into a cell.
You can find Excel’s data validation function by clicking Data on the top menu bar and then going to Data Validation. From there, you’ll see a dialogue box. Start with the Settings tab. This is where you choose your validation criteria. Click in the Allow box to see the options, which include:
You can restrict cells to only accept certain formats of data, such as:
- Whole numbers and decimals
- Text Length
- Dates and times
This ensures you input data correctly, leading to fewer validation errors. You can also set validation rules based on:
- Dropdown lists
- Custom formulas
Let’s take a look at these last two in more detail:
Dropdown lists
Creating a dropdown list of all the possible entries for a particular cell ensures your users only input the correct, consistent types of data.
For example, you might make a list of your sales locations. Instead of users inputting names in an inconsistent format, such as ‘Dallas’ versus ‘Dallas, TX’, they can just select ‘Dallas’ from the list.
To use dropdown lists, open a new worksheet and organize your data in a table. Then, head over to the data validation function and on the Settings tab and choose List. From there it’s just a case of inputting your data range into the Source box.
In this example on Microsoft’s help page, they’re using cities as their data type and choosing the source from their table.
.png?width=433&height=292&name=c04c2085-05f2-4d36-b68c-edb9cea91be4%20(1).png)
You might also want an input message to pop up when a user clicks a cell to prompt them to choose an option from the list. To do this, tick the Show input message when cell is selected box, and type your message. You can also add an error message if users input data incorrectly.
Custom formulas
Custom formulas allow you to create your own criteria for your data validation. This is useful if the basic options aren’t meeting your needs.
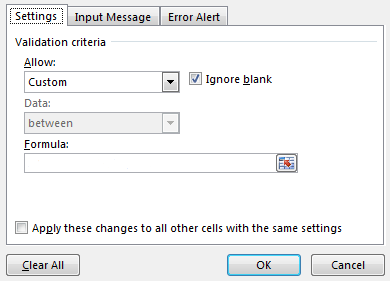
In the data validation tab, choose Custom in the Allow list. Underneath, you’ll see a box to input your formulas.

So what can custom formulas do? Well, here are some common custom formulas that might work for you:
- ISNUMBER/ISTEXT. This formula is useful when you want to ensure a certain character is a number or text. For example, if your product SKUs always start with a letter followed by numbers, you can use this formula to check users follow that format.
- EXACT. You can use the EXACT formula to check that a value exactly matches the intended format. This is useful if your data entries are case-sensitive.
- SUM. The SUM function can help you ensure users don’t enter a value that exceeds a certain number. This is especially useful if you’re setting budgets or working on finances. You might have an expenses limit of $100. If the user enters values above that, it will flag an error message.
Though formulas are great for making the most out of Excel’s data validation, there are still limitations.
What are the limitations of data validation in Excel?
The problem with in-app data validation is you have to create these criteria in each individual spreadsheet.
Aside from being tedious, this also places a lot of pressure on you. (Or other spreadsheet-owners.) If you forget to implement the checks, you could be back to square one.
It’s also very likely you’ll run into some errors using this method, such as:
- Missing dropdown fields. For your dropdown to recognize new list entries, make sure you include them in your range.
- Missing arrows. The dropdown arrows have a tendency to disappear unexpectedly. There are a few reasons for this, including arrows set to show in the active cell only, freeze panes or corruption. Make sure you’ve selected the In-cell dropdown box in order for the drop-down arrow to appear.
- Valid entries not being allowed. Data input is case-sensitive, so you’ll need to input the exact entry it’s looking for.
You might have gotten this far and decided that Excel’s validation is too limited for what you want to achieve. And that’s fine. There are other methods out there. If you’re looking for more from your data validation, consider using a data platform like CloverDX.
Enhance your validation with CloverDX
If you find yourself doing these data quality tasks too often, you might need to work with your IT teams to establish some more serious data processing and quality automations. For that, data integration tools with automation capabilities like CloverDX can come in handy. Not only can they automate your processes, but they can also do a lot of the heavy lifting for you too.
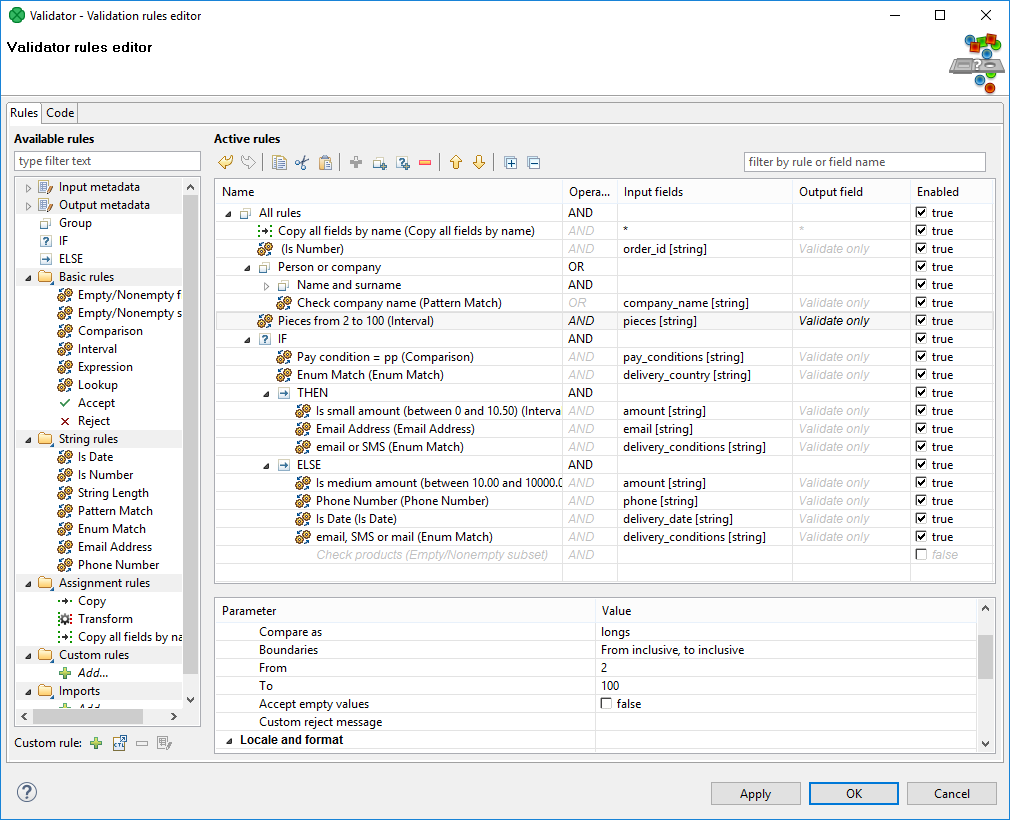
CloverDX’s Validator is a powerful filtering tool that passes your data through a series of checks (that you can create templates for) to sift out any quality issues. It then reports on data that didn’t pass through the filter, with detailed information about the reasons why. See it as the final checkpoint on the data quality assurance conveyor belt. The data allowed through will be squeaky-clean, ready for analysis.
Here’s what the validation process looks like in a more detailed tool. Fully automated with complex validation tools. This high level of validation maximizes the quality of your data for business decision-making. And the best part? You can easily repeat it on other data sets.

Ensure high-quality data with data validation checkpoints
Ready to ease the burden of spreadsheet-by-spreadsheet data validation checks? Excel’s in-app validation function can only get you so far. Standardize, automate and dig deeper with a more sophisticated data platform like CloverDX.


